介绍 有时候使用 Docker Hub 这样的公共仓库可能不方便,用户可以创建一个本地仓库供私人使用。
docker-registrydocker-registry
安装docker-registry 这里使用官方的 registry 镜像来启动私有仓库。
1 2 3 4 5 $ mkdir -p volumes/data volumes/config $ vim volumes/config/config.yml
config.yml 1 2 3 4 5 6 7 8 9 10 11 12 13 14 15 16 17 18 version: 0.1 log: fields: service: registry storage: cache: blobdescriptor: inmemory filesystem: rootdirectory: /var/lib/registry http: addr: :5000 headers: X-Content-Type-Options: [nosniff ] health: storagedriver: enabled: true interval: 10s threshold: 3
使用docker-compose启动容器
docker-compose.yml 1 2 3 4 5 6 7 8 9 10 11 12 13 14 15 16 version: "3.0" services: registry: container_name: registry image: registry:latest ports: - "5000:5000" volumes: - ./volumes/config/registry:/etc/docker/registry - ./volumes/data/registry:/var/lib/registry networks: - registry networks: registry: driver: bridge
上传下载镜像 创建好私有仓库之后,就可以使用 docker tag 来标记一个镜像,然后推送它到仓库。例如私有仓库地址为 127.0.0.1:5000。
上传
先在本机查看已有的镜像:
1 2 3 $ docker images REPOSITORY TAG IMAGE ID CREATED SIZE nginx latest f652ca386ed1 12 days ago 141MB
使用 docker tag 将 nginx:latest 这个镜像标记为 127.0.0.1:5000/nginx:latest。
格式:docker tag IMAGE[:TAG] [REGISTRY_HOST[:REGISTRY_PORT]/]REPOSITORY[:TAG]
1 2 3 $ docker tag nginx:latest 127.0.0.1:5000/nginx:latest REPOSITORY TAG IMAGE ID CREATED SIZE 127.0.0.1:5000/nginx latest f652ca386ed1 12 days ago 141MB
使用docker push上传标记的镜像
1 2 3 4 5 6 7 8 9 $ docker push 127.0.0.1:5000/nginx:latest The push refers to repository [127.0.0.1:5000/nginx] 2bed47a66c07: Pushed 82caad489ad7: Pushed d3e1dca44e82: Pushed c9fcd9c6ced8: Pushed 0664b7821b60: Pushed 9321ff862abb: Pushed latest: digest: sha256:4424e31f2c366108433ecca7890ad527b243361577180dfd9a5bb36e828abf47 size: 1570
查看 用浏览器或者curl查看仓库中的镜像
1 2 $ curl http://127.0.0.1:5000/v2/_catalog {"repositories" :["nginx" ]}
表明镜像已经被成功上传了.
下载 先删除已有镜像,再尝试从私有仓库中下载这个镜像。
1 2 3 4 5 6 7 8 9 10 11 12 13 14 15 $ docker rmi 127.0.0.1:5000/nginx:latest Untagged: 127.0.0.1:5000/nginx:latest Untagged: 127.0.0.1:5000/nginx@sha256:4424e31f2c366108433ecca7890ad527b243361577180dfd9a5bb36e828abf47 $ docker pull 127.0.0.1:5000/nginx:latest latest: Pulling from nginx e5ae68f74026: Pull complete 21e0df283cd6: Pull complete ed835de16acd: Pull complete 881ff011f1c9: Pull complete 77700c52c969: Pull complete 44be98c0fab6: Pull complete Digest: sha256:4424e31f2c366108433ecca7890ad527b243361577180dfd9a5bb36e828abf47 Status: Downloaded newer image for 127.0.0.1:5000/nginx:latest 127.0.0.1:5000/nginx:latest
配置非 https 仓库地址 如果你不想使用 127.0.0.1:5000 作为仓库地址,比如想让本网段的其他主机也能把镜像推送到私有仓库。你就得把例如 192.168.199.100:5000 这样的内网地址作为私有仓库地址,这时你会发现无法成功推送镜像。
这是因为 Docker 默认不允许非 HTTPS 方式推送镜像。我们可以通过 Docker 的配置选项来取消这个限制,或者查看配置能够通过 HTTPS 访问的私有仓库。
linux系统设置 请在 /etc/docker/daemon.json 中写入如下内容(如果文件不存在请新建该文件),然后重启docker
1 2 3 4 5 6 7 8 9 { "registry-mirror" : [ "https://hub-mirror.c.163.com" , "https://mirror.baidubce.com" ] , "insecure-registries" : [ "192.168.199.100:5000" ] }
注意:该文件必须符合 json 规范,否则 Docker 将不能启动。
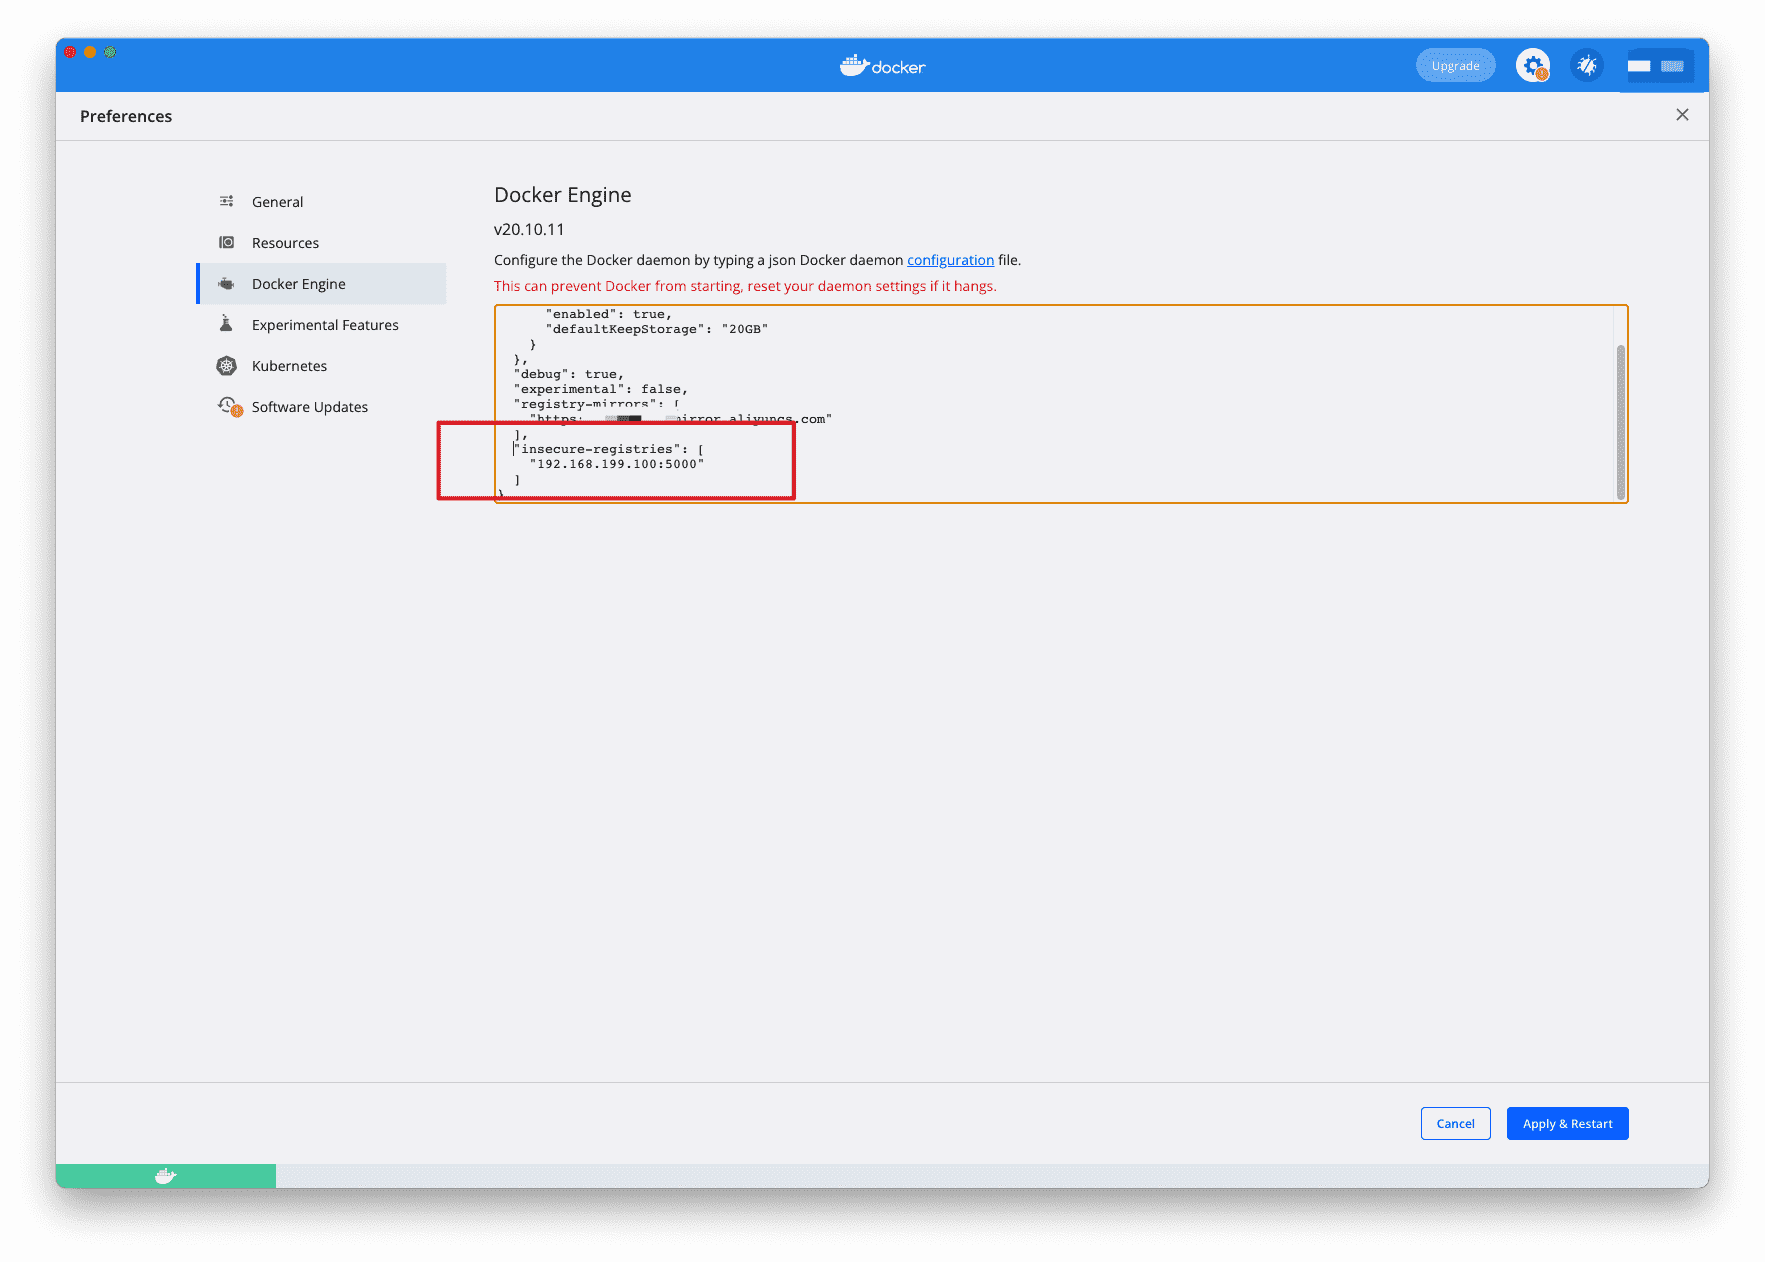
macOS、Windows 对于 Docker Desktop for Windows 、 Docker Desktop for Mac 在设置中的 Docker Engine 中进行编辑 ,增加和上边一样的字符串即可。
配置https仓库地址 原生配置 新建目录,volumes/config/registry/ssl
配置https需要证书,两个文件:.key和.crt,放到上面的ssl目录
若你拥有一个域名,国内各大云服务商都提供免费的站点证书,直接下载下来即可
若没有域名,也你可以使用openssl自行签发证书,放到ssl目录
准备站点证书 这里假设我们将要搭建的私有仓库地址为 docker.domain.com,下面我们介绍使用 openssl 自行签发 docker.domain.com 的站点 SSL 证书。
第一步创建 CA 私钥。
1 2 3 4 5 6 $ cd volumes/config/registry/ssl $ openssl genrsa -out "root-ca.key" 4096 Generating RSA private key, 4096 bit long modulus ..................................................................................................................................................++ ..........................................++ e is 65537 (0x10001)
第二步利用私钥创建 CA 根证书请求文件。
1 2 3 4 $ openssl req \ -new -key "root-ca.key" \ -out "root-ca.csr" -sha256 \ -subj '/C=CN/ST=JiangSu/L=SuZhou/O=Your Company Name/CN=Your Company Name Docker Registry CA'
以上命令中 -subj 参数里的 /C 表示国家,如 CN;/ST 表示省;/L 表示城市或者地区;/O 表示组织名;/CN 通用名称。
第三步配置 CA 根证书,新建 root-ca.cnf。
1 2 3 4 5 $ vim root-ca.cnf [root_ca] basicConstraints = critical,CA:TRUE,pathlen:1 keyUsage = critical, nonRepudiation, cRLSign, keyCertSign subjectKeyIdentifier=hash
第四步签发根证书。
1 2 3 4 $ openssl x509 -req -days 3650 -in "root-ca.csr" \ -signkey "root-ca.key" -sha256 -out "root-ca.crt" \ -extfile "root-ca.cnf" -extensions \ root_ca
第五步生成站点 SSL 私钥。
1 $ openssl genrsa -out "docker.domain.com.key" 4096
第六步使用私钥生成证书请求文件。
1 2 $ openssl req -new -key "docker.domain.com.key" -out "site.csr" -sha256 \ -subj '/C=CN/ST=JiangSu/L=SuZhou/O=Your Company Name/CN=docker.domain.com'
以上命令中 -subj 参数里的 /C 表示国家,如 CN;/ST 表示省;/L 表示城市或者地区;/O 表示组织名;/CN 通用名称。
第七步配置证书,新建 site.cnf 文件。
1 2 3 4 5 6 7 8 $ vim site.cnf [server] authorityKeyIdentifier=keyid,issuer basicConstraints = critical,CA:FALSE extendedKeyUsage=serverAuth keyUsage = critical, digitalSignature, keyEncipherment subjectAltName = DNS:docker.domain.com, IP:127.0.0.1 subjectKeyIdentifier=hash
第八步签署站点 SSL 证书。
1 2 3 $ openssl x509 -req -days 750 -in "site.csr" -sha256 \ -CA "root-ca.crt" -CAkey "root-ca.key" -CAcreateserial \ -out "docker.domain.com.crt" -extfile "site.cnf" -extensions server
这样已经拥有了 docker.domain.com 的网站 SSL 私钥 docker.domain.com.key 和 SSL 证书 docker.domain.com.crt 及 CA 根证书 root-ca.crt。
将 docker.domain.com.key docker.domain.com.crt root-ca.crt 这三个保留,删除其他文件。
生成http认证文件 1 2 3 4 5 6 $ mkdir volumes/config/registry/auth $ docker run --rm \ --entrypoint htpasswd \ httpd:alpine \ -Bbn username password > auth/nginx.htpasswd
将上面的 username password 替换为你自己的用户名和密码。
配置私有仓库 编辑配置文件:volumes/config/registry/config.yml
官方配置文件文档:https://docs.docker.com/registry/configuration/
1 2 3 4 5 6 7 8 9 10 11 12 13 14 15 16 17 18 19 20 21 22 23 24 25 26 27 28 29 30 31 32 33 34 35 version: 0.1 log: accesslog: disabled: true level: debug formatter: text fields: service: registry environment: staging storage: delete: enabled: true cache: blobdescriptor: inmemory filesystem: rootdirectory: /var/lib/registry auth: htpasswd: realm: basic-realm path: /etc/docker/registry/auth/nginx.htpasswd http: addr: :443 host: https://docker.domain.com headers: X-Content-Type-Options: [nosniff ] http2: disabled: false tls: certificate: /etc/docker/registry/ssl/docker.domain.com.crt key: /etc/docker/registry/ssl/docker.domain.com.key health: storagedriver: enabled: true interval: 10s threshold: 3
修改本地hosts 编辑 /etc/hosts
1 2 $ vim /etc/hosts 127.0.0.1 docker.domain.com
修改docker-compose.yml文件 把端口改为443
重启docker-compose 1 2 $ docker-compose down $ docker-compose up -d
测试私有仓库功能 由于自行签发的 CA 根证书不被系统信任,所以我们需要将 CA 根证书 ssl/root-ca.crt 移入 /etc/docker/certs.d/docker.domain.com 文件夹中。
1 2 3 $ sudo mkdir -p /etc/docker/certs.d/docker.domain.com $ sudo cp ssl/root-ca.crt /etc/docker/certs.d/docker.domain.com/root-ca.crt
登录到私有仓库。
1 2 3 4 5 6 7 8 $ docker login docker.domain.com Username: username Password: WARNING! Your password will be stored unencrypted in /root/.docker/config.json. Configure a credential helper to remove this warning. See https://docs.docker.com/engine/reference/commandline/login/#credentials-store Login Succeeded
尝试推送、拉取镜像。
1 2 3 4 5 6 7 8 9 10 11 12 13 14 15 16 17 18 19 20 21 22 23 24 25 $ docker tag nginx:latest docker.domain.com/nginx:latest $ docker push docker.domain.com/nginx:latest The push refers to repository [docker.domain.com/nginx] 2bed47a66c07: Pushed 82caad489ad7: Pushed d3e1dca44e82: Pushed c9fcd9c6ced8: Pushed 0664b7821b60: Pushed 9321ff862abb: Pushed latest: digest: sha256:4424e31f2c366108433ecca7890ad527b243361577180dfd9a5bb36e828abf47 size: 1570 $ docker rmi docker.domain.com/nginx:latest $ docker pull docker.domain.com/nginx:latest latest: Pulling from nginx e5ae68f74026: Pull complete 21e0df283cd6: Pull complete ed835de16acd: Pull complete 881ff011f1c9: Pull complete 77700c52c969: Pull complete 44be98c0fab6: Pull complete Digest: sha256:4424e31f2c366108433ecca7890ad527b243361577180dfd9a5bb36e828abf47 Status: Downloaded newer image for docker.domain.com/nginx:latest docker.domain.com/nginx:latest
测试成功,如果我们退出登录,尝试推送镜像。
1 2 3 4 5 $ docker logout docker.domain.com Removing login credentials for docker.domain.com $ docker push docker.domain.com/nginx:latest Error response from daemon: Head https://docker.domain.com/v2/buubiu/nginx/manifests/latest: no basic auth credentials
发现会提示没有登录,不能将镜像推送到私有仓库中。
使用NGINX 加密代理配置 如果你本机占用了 443 端口,你也可以用以下配置
官方示例: Nginx 代理
准备站点证书 见 准备站点证书
配置nginx 这里用docker启动nginx
NGINX 示例配置如下
1 2 3 4 5 6 7 8 9 10 11 12 13 14 15 16 17 18 19 20 21 22 23 24 25 26 27 28 29 30 31 32 33 34 35 36 37 38 39 40 41 42 43 44 45 46 47 48 49 50 51 52 upstream register{ server "YourHostName OR IP" :5000 ; } map $http_upgrade $connection_upgrade { default upgrade; '' close; } server { server_name YourDomainName; listen 443 ssl; ssl_certificate /etc/nginx/conf.d/ssl/example.crt; ssl_certificate_key /etc/nginx/conf.d/ssl/example.key; ssl_session_timeout 5m ; ssl_protocols TLSv1 TLSv1.1 TLSv1.2 ; ssl_ciphers HIGH:!aNULL:!MD5; ssl_prefer_server_ciphers on ; large_client_header_buffers 4 32k ; client_max_body_size 300m ; client_body_buffer_size 512k ; proxy_connect_timeout 600 ; proxy_read_timeout 600 ; proxy_send_timeout 600 ; proxy_buffer_size 128k ; proxy_buffers 4 64k ; proxy_busy_buffers_size 128k ; proxy_temp_file_write_size 512k ; location /v2 { proxy_set_header Host $host ; proxy_set_header X-Forwarded-Proto $scheme ; proxy_set_header X-Forwarded-Port $server_port ; proxy_set_header X-Forwarded-For $proxy_add_x_forwarded_for ; proxy_http_version 1 .1 ; proxy_set_header Upgrade $http_upgrade ; proxy_set_header Connection $connection_upgrade ; proxy_redirect off ; proxy_set_header X-Real-IP $remote_addr ; proxy_pass http://register; proxy_read_timeout 900s ; } error_page 500 502 503 504 /50x.html; }
启动命令:
记得把证书放到conf.d目录中,挂载到容器中
1 2 3 4 5 $ docker run -d \ -p 5043:443 \ -name nginx \ -v ./volumes/config/conf.d:/etc/nginx/conf.d \ nginx:latest
配置https 1 2 3 4 5 6 7 8 $ openssl s_client -showcerts -connect YourDomainName OR HostIP:443 </dev/null 2>/dev/null|openssl x509 -outform PEM >ca.crt $ cat ca.crt | sudo tee -a /etc/ssl/certs/ca-certificates.crt $ systemctl restart docker
测试私有仓库功能 登录到私有仓库。
1 2 3 4 5 6 7 8 $ docker login docker.domain.com:5043 Username: username Password: WARNING! Your password will be stored unencrypted in /root/.docker/config.json. Configure a credential helper to remove this warning. See https://docs.docker.com/engine/reference/commandline/login/#credentials-store Login Succeeded
尝试推送、拉取镜像。
1 2 3 4 5 6 7 8 9 10 11 12 13 14 15 16 17 18 19 20 21 22 23 24 25 $ docker tag nginx:latest docker.domain.com/nginx:latest $ docker push docker.domain.com:5043/nginx:latest The push refers to repository [docker.domain.com:5043/nginx] 2bed47a66c07: Pushed 82caad489ad7: Pushed d3e1dca44e82: Pushed c9fcd9c6ced8: Pushed 0664b7821b60: Pushed 9321ff862abb: Pushed latest: digest: sha256:4424e31f2c366108433ecca7890ad527b243361577180dfd9a5bb36e828abf47 size: 1570 $ docker rmi docker.domain.com:5043/nginx:latest $ docker pull docker.domain.com:5043/nginx:latest latest: Pulling from nginx e5ae68f74026: Pull complete 21e0df283cd6: Pull complete ed835de16acd: Pull complete 881ff011f1c9: Pull complete 77700c52c969: Pull complete 44be98c0fab6: Pull complete Digest: sha256:4424e31f2c366108433ecca7890ad527b243361577180dfd9a5bb36e828abf47 Status: Downloaded newer image for docker.domain.com/nginx:latest docker.domain.com:5043/nginx:latest
测试成功,如果我们退出登录,尝试推送镜像。
1 2 3 4 5 $ docker logout docker.domain.com:5043 Removing login credentials for docker.domain.com:5043 $ docker push docker.domain.com:5043/nginx:latest Error response from daemon: Head https://docker.domain.com:5043/v2/nginx/manifests/latest: no basic auth credentials
发现会提示没有登录,不能将镜像推送到私有仓库中。